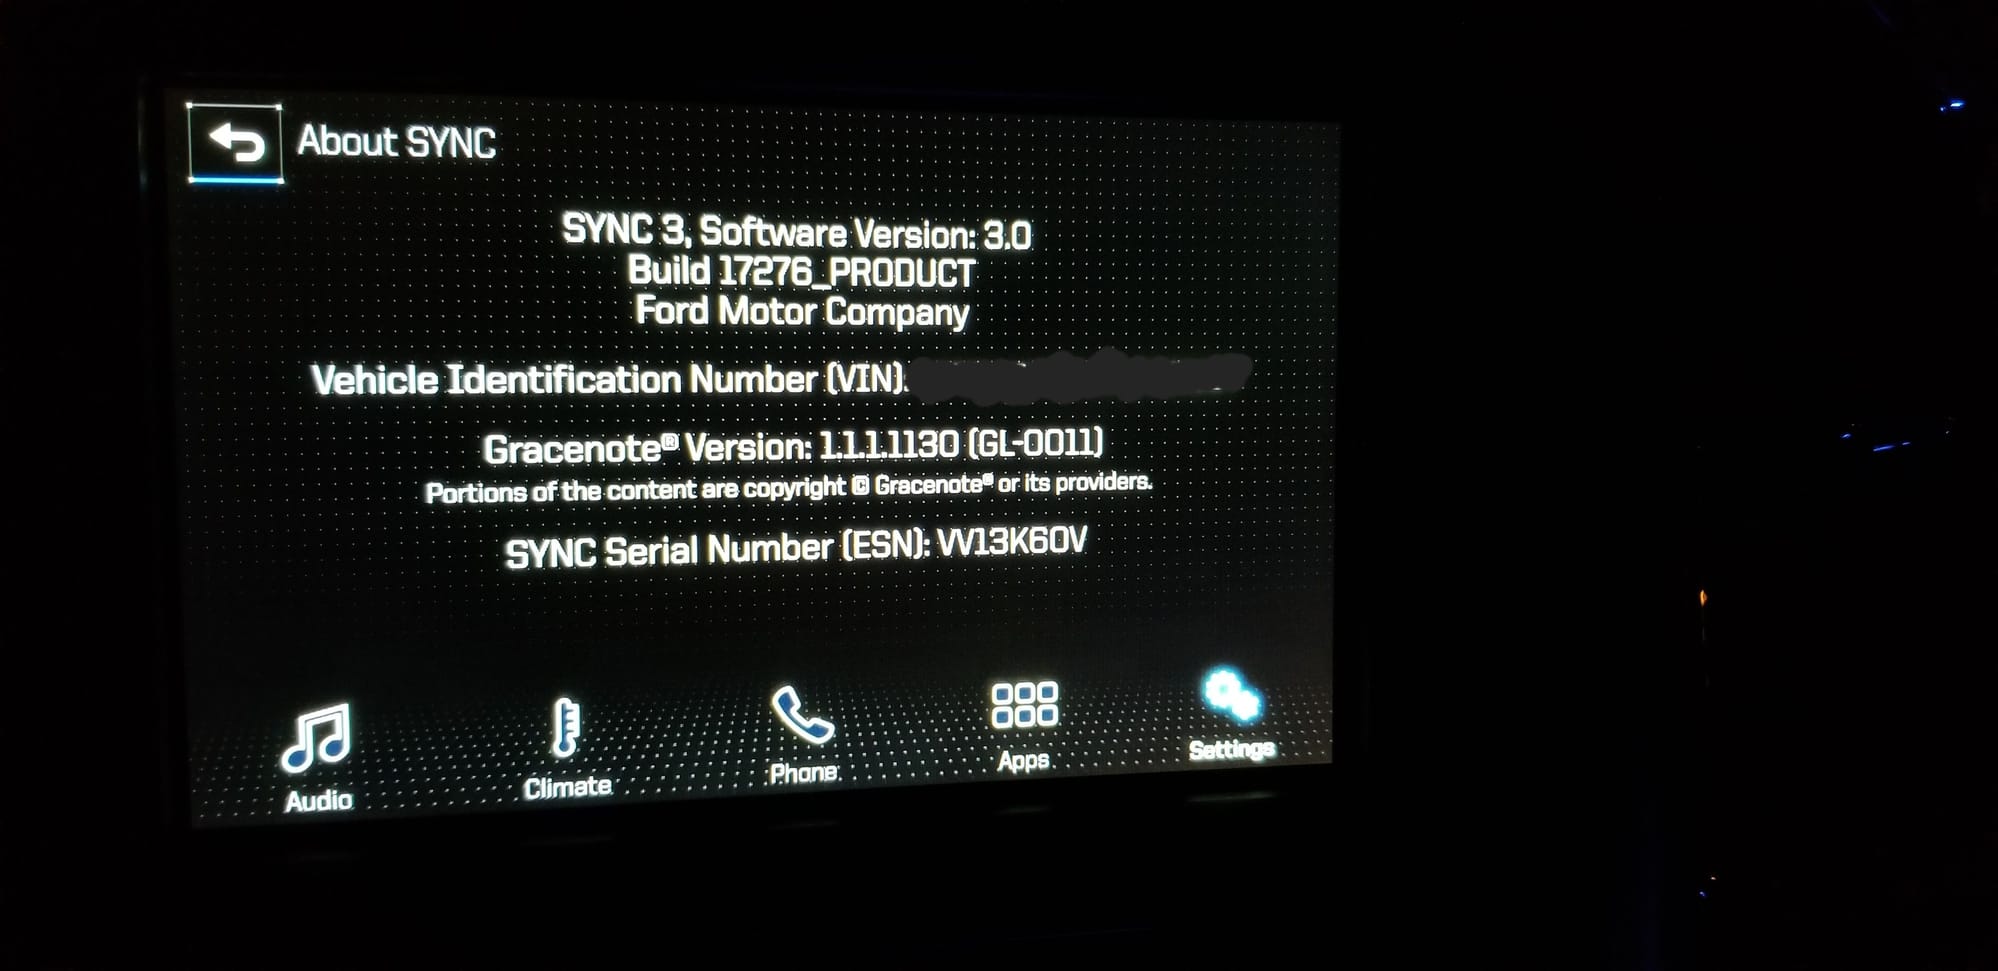
*UNOFFICIAL* SYNC 3 Version 3 update BUILD 17276 is OUT

If you liked my last thread on Ford SYNC 3 Version 3.0 - this is even better!  A new build!

Mirror: Here

Non-Nav Version 
Mirror: Here 

(Follow official pdf instructions below) Installation instructions: 
1. Download. 
2. Unzip onto desktop. 
3. Grab a USB Flash Drive, 32GB minimum

4. Format the drive to exFAT.

5. Put the extracted files inside the flash drive. 
6. Turn car on. Turn bluetooth off, just in case(optional). Or master reset before beginning.
7. It might take 5 mins for Updating System Software message to pop up, then 19 mins to install from there on

Depending on the Ford model, it might reboot automatically after installation is complete, if navigation maps don't come back don't worry turn off/on the car again.

*OFFICIAL UPDATE v2.3.10 --> OWNER.FORD.COM*

**CAUTION:There are FOUR versions to this update, MY 16 Nav/Non-Nav, and MY 17 Nav/Non-Nav, a single file will not work for both years! Even if they appear identical, use the one for your model year! You risk damaging APIM and/or Gracenotes and possibly other things**

***FOR INSTALLATION TO GO FLAWLESSLY THE FIRST TIME, USE MIN. 32GB USB DRIVE WITH 3.0 SPEED FOR BEST RESULTS.***


Mirror links:North America: (Follow pdf attachments at the bottom for instructions)
Official link to MY 16 w/Nav: HereOfficial link to MY 17 w/Nav: Here

USB Step 1 PDF
USB Step 2 PDF
USB Step 3 PDF

USB Upgrade to SYNC3 Version 3.0

Well, if you're like me - you love the Ford Sync 3 interface - while it's not perfect, it's pretty darned good!  Carplay is a nice update but if you've updated to IOS 11 - you'll notice some weird things going on - but guess what!? If you don't want to wait for the WiFi update - you can install SYNC 3 Version 3.0 using a USB drive!


There are new features for CarPlay with 
  1. New Nav Icon. 
  2. Fixed keyboard
  3. added symbol $
  4. MUCH faster interface smoother, snappier
  5. Support for new apps

**disclaimer - do this at your own risk! not my fault if it goes belly up!**


Installation instructions: 1. Download. 2. Unzip. 3. Grab a USB Flash Drive, 4GB is fine. 4. Format the drive to either exFAT or FAT32. 5. Put the extracted files inside the flash drive. 6. Turn car on. 7. Plug in car and enjoy!!


***** Note that depending on your USB device it might take up to 10 minutes for the stereo to show "Updating System"... *****

The USB in the car is NOT USB 3 therefore read speed is limited, so if you don't see anything, DO NOT unplug - just wait.... 


There are two versions to update your particular SYNC 3 system

Navigation 
Non-Navigation


found this over at http://www.mustang6g.com/forums/showthread.php?t=90236&fref=gc&dti=935473876561093

Focus STaRS american flag vinyl - looks great!

I saw the Focus STaRS (get it?) American Flag Quarter Window Decals and thought, dang that would look awesome on the ST!  I was right! 👍👍


They are a larger sheet so you'll have to lay it out on the glass, trim the edges, then place the vinyl and trim as needed - took me about 5 minutes per side... very nice quality and subtle patriotism!

Goes great with the Magnetic Metallic paint!

Boomba Oil Catch can - doing it's job!

I installed the Boomba Oil Catch Can a few months back...
http://2016-fost.blogspot.com/2017/03/boomba-racing-stage-2-oil-catch-can.html 


7,000 miles later - see what's in the catch can?  ICK!


Boomba short shifter installed!

Finally after about 6 months I got some time today to install the Boomba short Shifter with Shift Plate


I'll be honest, it took me about 5 hours to install everything...


Position        % of OEM Reduction
 Adapter plate
1 80%   20%
2 70%   30%
   
Shift lever
 1 90%        10%
 2 80%   20%
 3 70%   30%
   
Combination
1 & 1 72%   28%
 1 & 2 64%   36%
 1 & 3 56%   44%
 2 & 1 63%   37%
 2 & 2 56%   44%
 2 & 3 49%   51%

I went moderate - which is PLENTY at 36% reduction in shorter shifts, it feels amazing!  The bushings make the shifter feel like it's a slotted shift-gate, seriously amazing feel - no wobble, just BAM into gear... LOVE IT!

Here are some pics of the install :)

 The dash and shifter tunnel all torn apart - EEK!
Aluminum bushings installed on the shifter too!  All finished!  Nice lower stance, and the shifts go CLICK-SNICK!  :)


No more drone - Ford Racing Catback!

A few months back, I bought the Cobb 4" catback because it was beautifully handcrafted, great design, and backed by a fantastic name in 4-cyl turbo tuners.  While it all went in great - my ageing ears were struggling with the drone that a 4" catback gives on a 4-cylinder turbo car... just too much for my taste, although it did sound fantastic!

Next up - is Ford Racing 2.5" catback that is actually built by Borla and stamped with Ford all over it... not quite as shiny as the Cobb, but the size difference removes all the drone!


Now, mind you it's not cheap - heck nothing is cheap anymore!  But the quality of this catback is great, everything bolted in quickly and efficiently.

The catback uses clamps to seal the tubing together and it fit snugly together - not unexpected for Borla who makes great quality products!

The Ford Racing design also includes a front resonator to cut back on drone and give a mellow, sporty sound.  The standard Borla part doesn't have the extra resonator and will be louder by design.

The exhaust tips - what everyone sees after you pass them - are a cool fluted design, and while they 'look' slick - we shall see how easy they are to clean...


Driving impression:  The exhaust note is louder than OEM which is great - even initial startup sounds good.  Compared to the Cobb, it's MUCH quieter.  The turbo spool and BOV sounds are more pronounced as well.  Absolutely NO drone when you're in 6th gear and going uphill around 2,500 RPM - this is where the Cobb would remind you that it was there...

Even though it's pricey - this catback gets two 👍👍


Let there be light! (in my hatch)

Some of the simplest (dumbest) things that we take for granted is lighting, sure everyone thinks of headlights - but what about the interior?  You know, you just got back from the store and you pop the trunk/hatch and you can barely see...

A simple, inexpensive mod is to upgrade to lights with brighter lumens and longer life - so you do this ONCE, not many times...

Diode Dynamics has a great reputation, we love their driving lights Mountune MP275 FMIC Installed so I opted for some 194 HP5 Cool White LEDs from DD.


Super simple install, I'll let the pics do the talking...

OEM 194 bulbs (incandescent) about 4300K  - under cover (normal) on left and exposed right


NEW HP5 LED installed (exposed) these are 6000K

this is the HP5 installed behind the lens

left is OEM incandescent - right is the HP5 LED

and the final result with both HP5 installed!

as you can see - it's a much brighter, whiter light and visibility is increased at probably 1/4 of the power draw and should last the lifetime of the vehicle!  

Definitely Two-Thumbs Up! 
👍👍

Boomba Racing Stage 2 Oil Catch Can - finally installed!

Finally got around to installing the Boomba Racing Boomba Racing Stage 2 Oil Catch Can.  I bought it around Christmastime from a good sale, but never had time until this weekend.  


For turbocharged cars, the purpose of an oil catch can is very important. The can should work to prevent blow by of oil, which could lead to dangerous situations of coating couplers, causing them to slide off under boost, coating the fins inside an intercooler which drastically decreases its efficiency, and ultimately end up cooking inside your turbo, contributing to a nasty condition of what is called “oil coking” where the oil turns to a charcoal like substance in the turbo over time. In addition, you don’t want any blow by on your pistons either.


To do this, a catch can works by having one line running from the PCV valve (connected to the block) into the inlet on the catch can. From there, it goes into the can, and past a filter. The oil should collect at the bottom. The Boomba catch can is 350ml (pretty good size) to hold more oil and junk. The filter inside is used to prevent any oil from then escaping back out of the catch can through the other outlet and hose that will run back to the intake manifold. 
The installation 'looks' simple - and looking back, had I done the install before it's not too bad.  The instructions are here.  Undoing the bolts for the intake is REALLY simple, 6 bolts - no brainer.  Disconnecting the connectors is EASY.  The hardest part is getting to the PCV connector behind the intake and cutting the hose to the block.

Mounting the catch can takes a little work since it's a tight spot, but there's plenty of play in the coupling to adjust - be sure to tighten everything well :)


I will be checking the can each oil change and 1/2 way in between changes as well.  Will report back on the junk found!

It's the little things that make a difference!

Little changes and mods are always fun, and hopefully can be done cost effectively.  I ordered a really nice dead-pedal for the ST to complement the existing metal pedals from factory.


Ford Focus ST Dead Pedal Foot Rest

Made from a brushed high grade 304 Stainless Steel. 

CNC waterjet cut and dimpled. 

Dead pedal attaches with heavy duty double sided carpet tape which is included. 


Well, I can't just leave things alone - the center logo "ST" is cut out- looks great, but all the "ST" logos on the car are red. I was walking by our wine rack and noticed something, do you see it too?


No no, you don't see a drinking problem - if I had a drinking problem, they'd all be empty! :)
Hint, it's the 2nd slot down on the left.. 

YEP!  I saw the RED foil top on a bottle and thought - that would be a nice complement to the ST logo!  Hmm, maybe I should drink more wine...

So I carefully removed the foil wrap... see how nice!  RED and shiny, and it's METAL so it won't break down if it gets wet!


Next, I carefully snipped it into a flat piece of red aluminum, flipped over the pedal to see how it would fit...

Then I thought, I could use some simple scotch tape to hold it on - but I had a better idea!  I have a roll of aluminum tape (used for heating duct and chimney repairs) and cut a piece of that...


So, the foil tape is holding the foil topper to the plate, everything is sealed up nicely now in the event of water - and here's the results!


The ST logo is now RED, and even shiny metal too!

What do you think?  Worthwhile 'free' mod?  


Now I'll go have some wine ;)


Mountune MP275 FMIC Installed

Had the Mountune MP275 FMIC installed yesterday - quite a process to remove the front bumper and lights - but now it's done!


Also installed the Diode Dynamics XML2 LED Foglights - MUCH MUCH brighter than stock!

bummer you can't see the logo very well with the OEM bumper...


How To: Upgrading Ford SYNC3 to version 2.2

Well, Ford has been a bit lax in deploying the SYNC3 2.2 update - was supposed to be summer 2016. Fortunately, the interwebs have provided :)

Ford Sync 3 2.2 Software Update Information/Instructions

Official Update for Ford Sync 3 1.0/1.1/2.0 -> 2.2

Android Auto WILL work with existing hardware. 
Apple CarPlay WILL NOT work with existing hardware and requires upgraded USB Interface.

I used a FAT32 formatted 2GB USB Drive to load installation files (Non-WiFi Update)
Vehicle Engine should be running for entire update to maintain battery during installation or connected to a battery charger/maintainer


Download Links (Ford Direct):
Navigation Equipped: http://ivsu.binaries.ford.com/owner-package/715283556826568730/HN1T-14G381-LG.zip
Non-Navigation: http://ivsu.binaries.ford.com/owner-package/5414554217520963151/HN1T-14G381-LG.zip


Change Log: 
Sync 3 2.2.6

This software release is the latest update in our continued efforts to improve system performance, device connectivity, and the overall SYNC experience.

This software contains the following enhancements:
  • Updated voice recognition engine.
  • Bluetooth phone, media, and Wi-Fi improvements.
  • Navigation user interface improvements (if equipped).
  • Android Auto for supported devices.
  • Apple CarPlay for supported devices. Owners of 2016 models with SYNC 3 are required to perform a software upgrade and purchase a hardware upgrade through your dealer.
The installation of this update will take up to 60 minutes to complete. DO NOT remove your USB drive or turn off your vehicle. You must wait until Installation Complete is displayed on the center screen before removing your drive or turning your vehicle off. Be sure your vehicle engine is running (not in accessory mode) throughout the entire installation process. Although your vehicle must be in park when you initiate the installation process, once the download process has begun, you may drive your vehicle.

** Mine only took 15 Minutes to Install **


Bluetooth works MUCH better now - just need to find the USB HUB in stock to make Apple CarPlay come to life!  WOOHOO!